How I set my Neovim up for C/C++ and Python
Running almost always in Ubuntu, I wanted to get familiar with the terminal and its tools. I found out about terminal text editors and read great stories about Vim and its fork Neovim. And how it can be made into a great code editor.
I started with Vim in late 2020, and from 2022 I chose to move to Neovim.
From the start, I spent months to configure Vim to my liking, and when I moved to Neovim, it was surprisingly easier than expected to transfer my configuration.
Therefore in this post, I’ll show you a way to customize Neovim (not Vim) in Linux to make your coding life easier, and also make it look great so you can show off to your friends!
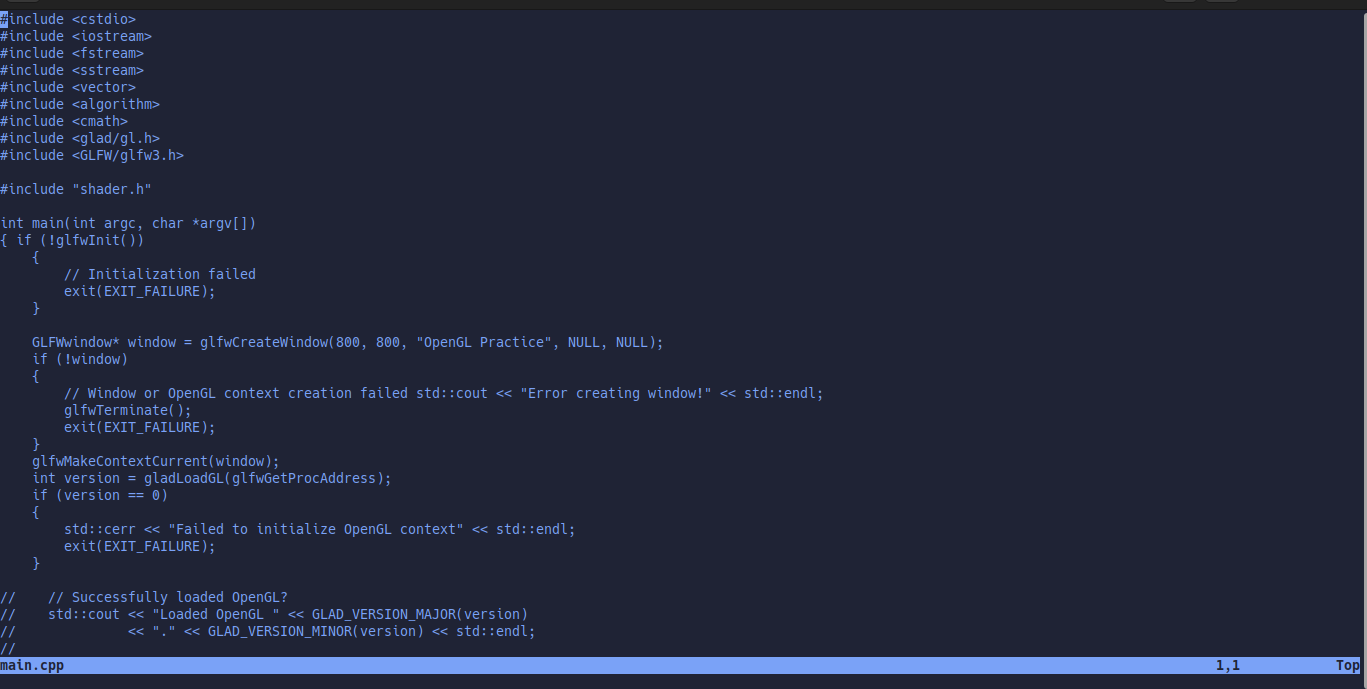
We’ll be going from this:
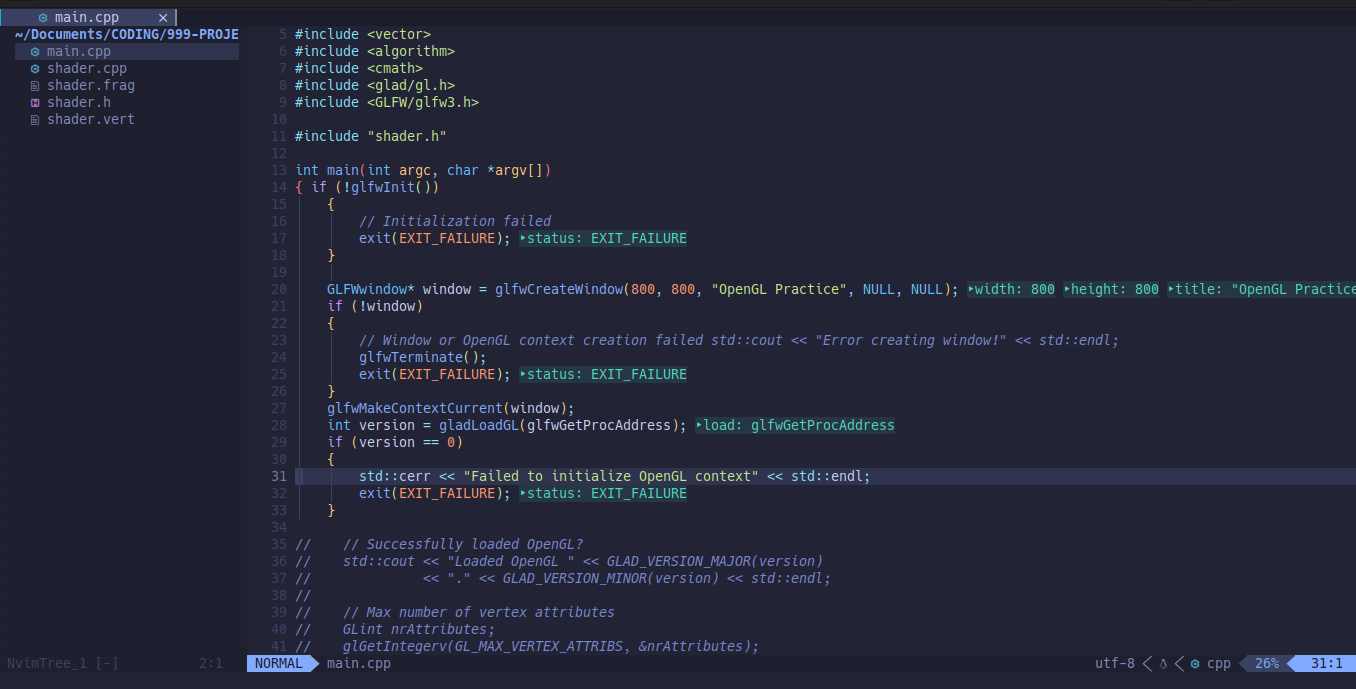
to this:
How to configure Vim/Neovim
Remember! All of these commands are for a Linux system. And I’ll focus on Neovim.
Configuring Vim is done by modifying the .vimrc file in the $HOME folder. Neovim uses
a different file, $HOME/.config/nvim/init.vim.
Adding the following code to the init.vim file:
set runtimepath^=~/.vim runtimepath+=~/.vim/after
let &packpath = &runtimepath
source ~/.vimrc
will copy your Vim configuration Neovim. So, you’ll only have to modify the .vimrc to configure
both Vim and Neovim.
To start extending the functionality of Vim/Neovim, there are:
- Built-in commands
- Third-party plugins, most of them open-source from GitHub.
Built-in commands
Let’s open the .vimrc by typing in the terminal:
nvim ~/.vimrc
then add the following lines:
set number
set cursorline
syntax on
set tabstop=4
set shiftwidth=4
set expandtab
If you don’t know how to use Vim/Neovim, check out my article on how to start using Neovim.
Let me explain what each of these lines does.
Line numbering
When using an IDE or a code editor, one of the features you’ll notice is line numbering.
When first starting a vanilla Neovim (a blank .vimrc), this feature is inactive.
set number activates this feature, and once you restart Neovim, you’ll see a column on the left
filled with numbers.
Current line highlighting
Code editors usually offer that feature, and though it’s subtle, it’s really helpful to see where your cursor is when you have many lines of code in front of you.
Just like line numbering, it’s an inactive feature for vanilla versions.
set cursorline switches it on and becomes active after restart.
Basic syntax highlighting
Syntax highlighting is really helpful for coding, you’ll have an easier time identifying keywords, variables and functions names, etc. It’s also a basic feature of any code editor.
Again, inactive in vanilla versions, syntax on will make your code more colorful.
However I find the native syntax highlighting quite lacking and I found a great plugin to enhance it. More about it later.
Indentation settings
When writing code, we almost always use indentation to improve readability. Indentation is commonly defined by tab stops. Depending on standards, a tab stop can be equivalent to 2 or 4 spaces.
Python heavily relies on indentation, for functionality first, then readability.
A common value is 4 spaces, and we can configure this behavior in Neovim. That’s what those three lines do:
set tabstop=4
set shiftwidth=4
set expandtab
So while writing code, let’s say C/C++, opening a new block will automatically indent the code by 4 spaces relative to the parent block.
And of course, a restart will activate this functionality.
By now…
The .vimrc should look like this now:
set number
set cursorline
syntax on
set tabstop=4
set shiftwidth=4
set expandtab
and Neovim should feel more like a code editor rather than a simple text editor.
Open-source 3rd-party plugins
Plugins heavily extend the functionality of Vim/Neovim, and I could make it like an IDE if I wanted. I still want Vim/Neovim to be fast and have just the features I need, not more.
Almost every plugin I used with Vim is compatible with Neovim, except for the colorscheme.
I write mainly in C/C++ and some Python, so finding plugins suitable for these languages was necessary, and upon retrospect quite easy.
How to properly add plugins to Vim/Neovim
First of all, at the top of the .vimrc, I have to add 3 commands:
set nocompatible
filetype plugin on
set secure
This will ensure that I don’t have any compatibility issues with Vi (Vim “ancestor”), and that there will be filetype detection and proper plugin loading according to the filetype.
There are many plugin managers for Vim/Neovim and one of the most popular is vim-plug.
After installing it, I just have to add the plugins between the call plug#begin() and call plug#end() commands, like this:
call plug#begin()

" This is where
" you install
" all your plugins

call plug#end()
To install the plugins, I have to run :PlugInstall.
Colorscheme
Enhanced syntax highlighting
I admit I spent a lot of time deciding between colorschemes, it’s an endless quest for the seemingly perfect one. There’s none, but I found mine.
I’m now running the Tokyonight colorscheme and I’m very satisfied.
And as I wrote above, native syntax highlighting is not so great in my opinion. Thankfully, vim-polyglot by sheerun enhances syntax highlighting by a lot. My code is much more colored but it’s not overwhelming and it helps me distinguish syntactic elements more clearly.
Let’s add them to the .vimrc:
call plug#begin()
Plug 'sheerun/vim-polyglot'
Plug 'folke/tokyonight.nvim', { 'branch': 'main' }
call plug#end()
To activate Tokyonight, I’ll add colorscheme tokyonight to my .vimrc.
A little more on appearance
By browsing Reddit, I found really good-looking Vim/Neovim setups and I wanted to improve upon an already good setup.
Before I switched to Neovim, I was using vim-airline on Vim, a statusline to improve the look and have more info displayed. Unfortunately, it is incompatible with Neovim.
When I searched for a proper Neovim colorscheme, Tokyonight mentioned a similar plugin to vim-airline, lualine. After a bit of configuring, I saw no change in behavior between this and vim-airline.
Let’s add it to my .vimrc in between call plug#begin() and call plug#end():
Plug 'nvim-lualine/lualine.nvim'
Plug 'kyazdani42/nvim-web-devicons'
At this point, I was quite happy that I customized Vim/Neovim a little more to my taste. I started writing some code in it, but it lacked some features compared to some IDEs.
LSP or Language Server Protocol
By default, Vim/Neovim have an autocompletion feature. Actually, Neovim is slightly better than Vim in that regard since it automatically shows a suggestion menu based on what’s already in your content.
But when it comes to writing code, for example Python, the code editor doesn’t know anything about Python and doesn’t show any proper suggestions.
To help with that, Microsoft created LSP (Language Server Protocol).
When I was using Vim, I was using the YouCompleteMe plugin. Since I now use Neovim, I chose to use Conquer of Completion.
After installing it by adding Plug 'neoclide/coc.nvim', { 'branch': 'release' } to the .vimrc, it’s important to configure it and install proper extensions.
After everything is set, Neovim should show proper suggestions when writing code.
Snippets engine
Snippets can make you slightly faster when writing code.
For example, when using a for loop, instead of writing the entire code for the loop, the snippet engine will generate it for you, and you just need to identify the looping variable and the ending condition, then the code in the loop.
One plugin I found that works seamlessly with Conquer of Completion is vim-snippets from honza. It requires no configuration.
I simply added Plug 'honza/vim-snippets to the .vimrc, installed it by running :PlugInstall and I was done.
Syntax checkers
When I’m coding, I’m bound to make some syntactic mistakes. For example in C++, I might forget a semicolon at the end of a statement, or count the wrong number of closing curly braces with nested blocks.
Code linters are there to notify when you’re not using a variable you declared or when you’ve made a syntactic mistake.
I use the Asynchronous Lint Engine to analyse my code. It’s quite fast and reliable.
I added Plug 'dense-analysis/ale to my .vimrc for that.
Conclusion
In this post, we’ve learned how to:
- Add and modify the
.vimrcto customize our Vim/Neovim editor. - Enable the basic features that make up a code editor such as line numbering and syntax coloring.
- Add plugins to further enhance the abilities of Vim/NeoVim.
- Add tools to make coding easier with snippets and a LSP.
By now, you should have a pretty functional Vim/Neovim code editor that is light and fast. While I do have other plugins installed, the ones I showed you today make the foundation of my Vim/Neovim setup.
I’ve been running with that specific setup for a couple of months and it really suits my needs. I can still extend Vim/Neovim in the future if needed so that’s why I think it’s a great editor.